

Basic D3 and React.js Integration
D3.js invoked within React.js takes a little getting used to due to the use of the virtual DOM from React.js. This guide lays out some simple steps.
Oct 22, 2020 • 6 Minute Read
Introduction
D3.js is an excellent tool for taking in data and manipulating the DOM based on that data. However, with React.js, the framework uses what's called the virtual DOM to represent HTML elements. This can be quite confusing for developers who are familiar with D3.js but want to integrate it within the context of a React.js app. This guide will show you the basics of calling D3.js from within a React.js component.
Setup
Start off by creating a basic component that will house your D3.js widget called MyD3Component:
      import React from 'react';
import * as d3 from "d3";

export default class MyD3Component extends React.Component {
  constructor(props) {
    super(props);

    this.myReference = React.createRef();
  }

  render() {
    return (
      <div ref={this.myReference}>
      </div>
    );
  }
}
The only odd thing here besides the inclusion of the D3.js library (import * as d3 from "d3"), is the creation of a reference in the line this.myReference = React.createRef(). This value will serve as a reference anchor to the virtual DOM, which can be accessed by D3.js instead of using an id or class attribute since we don't really have the HTML rendered yet. The integration of this reference is done by adding it as a value for the ref attribute of the main element that this component renders.
Next, create another React.js component that serves as your "app" and call it D3Example:
      import React from 'react';
import MyD3Component from './MyD3Component';

export default class D3Example extends React.Component {
  constructor(props) {
    super(props);
  }

  render() {
    var data = [10, 20, 30];

    return (
      <div>
        <h1>D3 Example</h1>
        <MyD3Component
          data={data}
        />
      </div>
    );
  }
}
The only thing this component initially does is have some dummy data with three integer elements in it. You pass this data as a property of MyD3Component, which can be accessed by its props as props.data.
Targeting the Virtual DOM
To interact with the virtual DOM, D3.js has to first perform a select() against a target using the reference object this.myReference. To do this, you can create a variable that represents this targeted element as follows:
var container = d3.select(this.myReference.current);
Drawing the Data with D3.js
Using container, you can now begin to take advantage of the various D3.js library calls to visualize your data. Start with something simple by appending a p tag for each element in the props.data attribute passed by D3Example. This can be done with the following code:
      container
  .selectAll("p")
  .data(this.props.data)
  .enter()
  .append("p")
  .text(function(d) {
    return "Value is " + d;
  });
The first thing the code does is to select all the p tags found within the container. It then inserts data using the .data(this.props.data) call before calling enter(). The next call in the chain will tell D3.js to append a p tag for every element found within this.props.data. Afterwards, the .text() call tells D3.js to add text to each data element extracted. The way the text is presented is logically programmed by a function passed to .text() that returns the text "Value is " plus the actual data element per iteration represented by the variable d.
Creating a Draw Function
Finally, you'll want to wrap everything up within a function defined inside the MyD3Component component called update:
      update() {
  var container = d3.select(this.myReference.current);

  container
    .selectAll("p")
    .data(this.props.data)
    .enter()
    .append("p")
    .text(function(d) {
      return "Value is " + d;
    });
}
Call update() as the component is loaded by invoking it within the componentDidMount lifecycle method:
      componentDidMount() {
  this.update();
}
Overall Code
Your final code should look like the following:
D3Example
      import React from 'react';
import MyD3Component from './MyD3Component';

export default class D3Example extends React.Component {
  constructor(props) {
    super(props);
  }

  render() {
    var data = [10, 20, 30];

    return (
      <div>
        <h1>D3 Example</h1>
        <MyD3Component
          data={data}
        />
      </div>
    );
  }
}
MyD3Component
      import React from 'react';
import * as d3 from "d3";

export default class MyD3Component extends React.Component {
  constructor(props) {
    super(props);

    this.myReference = React.createRef();
  }

  componentDidMount() {
    this.update();
  }

  update() {
    var container = d3.select(this.myReference.current);

    container
      .selectAll("p")
      .data(this.props.data)
      .enter()
      .append("p")
      .text(function(d) {
        return "Value is " + d;
      });
  }

  render() {
    return (
      <div ref={this.myReference}>
      </div>
    );
  }
}
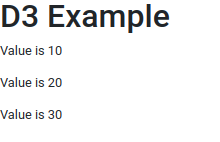
Once mounted to your HTML document, the output of the code should look like the following:
Conclusion
D3.js invoked within React.js takes a little getting used to due to the use of the virtual DOM from React.js. It can be quite confusing at first, but the trick is to follow these simple steps:
- Create a reference object using React.createRef() and attach it as a value to the target element via the ref attribute.
- Use the this.myReference.current property of the reference and pass it to D3.js' select call to create a container.
- Invoke your D3.js code within the referenced container.
- In a React.js approach, have your D3.js logic wrapped in a utility function so it can be easily called when a component has to be updated with new data.
Try it out yourself by extending the example to make a call to D3.js' attr() function to define the size of the area where you would draw your D3.js visualization and draw a border around it using D3.js' style() call.


Advance your tech skills today
Access courses on AI, cloud, data, security, and more—all led by industry experts.